Top 10 Water Heater Code Violations
Installing a tank water heater might seem easy, but some of these common mistakes could be life-threatening.

In the minds of many, installing a tank water heater is a piece of cake—an “I can’t believe I need a building permit to do this” kind of thing. These are the people who usually fail inspection. Indeed, a water heater can be easy to install, but replacing one in an existing home can introduce a host of complications. Some of this stems from the norms of the American home-building industry. Basements in new homes are usually left unfinished and pitched to buyers as a project they can easily tackle themselves when they need more living space. That day comes, and they go for it— frequently without a permit— unwittingly creating a number of code violations with respect to the water heater. One common mistake: boxing the water heater into a closet to hide it from view of the newly finished space. The deficiencies this creates surface when it comes time to replace the failing water heater and the building inspector shows up to sign off on the new installation. This kind of scenario happens more often than you might think; I see it all the time. There are a lot of code requirements around water heaters and not enough space to get into every one here. What follows are 10 of the most common code violations that I and other code professionals see out in the field when looking at water heaters, particularly replacement water heaters.

1. Confusion about pans and drains
Drip pans are required when tank-type water heaters are installed in places where a leak could cause damage. These pans are not meant to protect from a catastrophic tank failure; they’re meant to catch the slow leak that no one notices. In a basement with a concrete floor, damage isn’t generally a concern. When the basement is finished, it may be. Drip pans in new homes also require drains. Neither pans nor pan drains have always been required, and they have been a tricky issue when it comes to replacement water heaters in newly finished spaces. Is there a place to drain to, and a route to get there? Installers and inspectors long bickered over whether either was required in replacement installations where a pan and drain wasn’t previously provided. The 2015 IRC brought some clarity, stating that drains aren’t required when they weren’t previously provided. The pans themselves, however, must be installed if the water heater is located where a leak can cause damage. Prior to this, the top violation would have been not installing pans and drains with replacement water heaters—now, the issue is inspectors continuing to require drains without notice of this code change.
2. Unsupported expansion tanks
Some may tell you that an expansion tank is required at every water heater, but that isn’t in the IRC. Where requirements for expansion tanks show up in local codes, they’ve been added in. What is required is “a means for controlling increased pressure caused by thermal expansion … where required,” and that’s only necessary under certain conditions. Figuring out whether a particular installation meets those conditions can be complicated. The easy solution is to just add an expansion tank—it doesn’t hurt. But because it’s an easy way out, the default position in many locales has become “expansion tanks are required.” The real answer about whether they’re necessary should come from a professional installer, not a regulatory authority. There are other devices and methods for controlling pressure other than expansion tanks. When expansion tanks are included, physical support for them is something of concern, as installers often leave them simply hanging by the pipes they connect to. Read the manufacturer’s installation instructions before you do that. It’s not a good choice, and some local codes prohibit it.
3. Improper TPRV pipe installation
The temperature pressure relief valve (TPRV) is an incredibly important life-safety device on every water heater. Its proper functioning is the difference between a nice hot shower and an explosion. Unlike the expansion tank, which is intended to protect the piping system from pressure, the TPRV protects the water-heater tank from experiencing more pressure than it can handle. Here’s how your water heater becomes a pressure bomb: The boiling point of water that we are familiar with—212°F—is the temperature at which water at sea-level atmospheric pressure turns to vapor and greatly expands. But as pressure increases, so does the boiling point. This means that when pressure builds up inside a water heater, liquid water can get hotter than its atmospheric boiling point, until the tank ruptures. When 40 or more gallons of superheated water is suddenly brought to atmospheric pressure and instantaneously vaporizes, the massive expansion can launch your water heater through your house. The TPRVs themselves are not usually a problem on water-heater installations, as they come installed in the water heater. The problems occur in the pipe between the valve and the discharge point. The IRC provides a list of 14 specific criteria meant to keep this pipe open. It cannot connect directly to a drain system; must discharge through an air gap in the same room; cannot be smaller than the diameter of the valve it’s connected to; can only serve a single appliance; must discharge to the floor, pan, receptor, or outdoors; must not cause structural damage; must be observable to the occupants; cannot be trapped; must flow by gravity; must terminate within 6 in. of the floor or receptor; cannot be threaded or have any valves or tee fittings; must be made of materials approved for potable water; and must be one size larger and secured at the end when made of plastic tubing materials. Many installations are tripped up by a number of these specific requirements.
4. Unlisted cord and plug
Most items in this list apply to conventional gas water heaters, but electric water heaters are also common. The hazards of gas, venting, and combustion air are eliminated with electric appliances, but there is still one common violation to be found. These appliances are generally intended to be hardwired to a switch location, but installers often buy a generic cord-and-plug assembly and plug them into an available outlet. Electric water heaters can only be installed with a cord and plug where listed by the manufacturer for such installation, and they must use a cord and plug that has been listed for use with the specific make and model of water heater. This rarely happens, which is why I recommend hardwired installations.

5. Not enough vent and vent-connector clearance
Conventional tank water heaters generally utilize two types of vent and vent connectors: B-vent and single-wall. These vents get hot by design—a hot vent is part of what produces the draft required to remove the combustion products from the building. But B-vent and single-wall are not the same. B-vent has a pipe inside a pipe with an air space between them that insulates the outer pipe from the hot inner pipe. Because the outer wall of B-vent doesn’t get all that hot, code requires only 1 in. of clearance between it and combustibles. Single-wall vents get very hot, requiring a 6-in. clearance to combustibles. In an attempt to maximize finished floor space when boxing off the water heater from the rest of the room, people often don’t leave enough clearance between the new wall framing and the vent pipes. Basement-finishing projects are notorious for this code violation.
6. Insufficient vent and vent-connector slope
The ideal vent or chimney system is entirely vertical, though this is rarely feasible. More often, fuel-fired water heaters connect to a chimney or vent by way of a vent connector, which is essentially just another piece of pipe. The connector should be as short as possible and must slope upward from the water heater at a slope no lower than 1/4-in-12. Once it connects to the vent—the portion that leaves the building—things get more complicated. The general expectation is that the vent run vertically, with offsets no greater than 45° from vertical, but that is not the whole story. Vent-slope limitations hinge on a number of variables, including the diameter of the vent, length of the vent, type of vent, and a host of other things. Once a house is built and the vent system designed, it’s no easy task to evaluate and modify it later. When finishing basements, owners often find the water heater isn’t where they’d like it, so they move it and connect it back to the original vent with a long, low-slope vent connector. Long horizontal vent runs can greatly reduce the drafting ability of natural-draft appliances, and could lead to backdrafting of combustion gases into the home, creating a major life-safety hazard.
7. Incorrect draft-hood connection
Water heaters are tested and provided with their specific draft hood (draft diverter), but it doesn’t come attached; it’s in the box separately. The installer must attach the hood that came with the new appliance, and this almost always requires fasteners. Too often I’ve arrived at inspections where the hood from the old water heater is used on the new one. Even more often, the new hood is used but not properly fastened—the provided screws are still in a bag with the instructions, glued to the side of the water heater. This is a very embarrassing reason to fail inspection, so never forget the screws.
8. No support for plastic vents
High-efficiency power-vented water heaters with plastic, sealed vents are popular, especially in new, tight homes, and as replacements for conked-out conventional water heaters. They eliminate the issues with conventional vent clearances and slope, and can also relieve the issues of interior combustion air. The plastic vents can be installed horizontally, but they must be supported according to the manufacturer’s specs. Water vapor produced during combustion will condense inside these vents, so they must be sloped to drain. These horizontal vent pipes are often fished over finished ceilings in a basement and left unsupported. A sag in the vent can allow water to accumulate and affect the safe and efficient operation of the appliance. Though not a joy to anyone, sometimes a finished ceiling needs to be cut to install proper support for the vent.
9. Sediment traps that don’t work
A sediment trap and a drip leg are often considered one in the same, but not by the code. A drip is only required when wet gas (gas with a small amount of liquid present) exists. A drip simply needs to allow gravity to collect the liquid in the low spots. A sediment trap is required when an integral trap is not provided in the appliance, and it usually isn’t. From manufacturing to service, gas pipe goes through quite a bit of handling, cutting, and threading that can leave some debris— usually bits of metal—in the pipe. This debris, or sediment, can be small enough to get caught in the flow of the gas. Unlike a drip leg, gravity alone will not separate the sediment from the gas stream. A sediment trap requires a hard turn that the gas can flow around but sediment can’t—much like a sharp turn in a fast-moving go-kart has the potential to fling you out of the driver’s seat. Installing this correctly has been so misunderstood in the industry that the 2012 edition of the International Fuel Gas Code added a figure to show how it must be done.
10. Lack of combustion air
This is a big subject, with more to say than what follows. Combustion air does a few things: It ventilates the appliance, it provides oxygen for the fire, it feeds an open draft hood to maintain draft, and it replaces the air leaving the building with fresh outside air in order to maintain neutral pressure. In older homes, before the codes were loaded down with provisions for energy conservation, homes were leaky and interior-air calculations were done (or not done) to provide sufficient combustion air. A naturally leaky home will naturally allow replacement air (combustion air) to enter—this is one method allowed in the code. When the home was built, water heater installed, and combustion air designed, the water heater was likely in a wide-open unfinished basement. This offered a large volume of interior combustion air. With the air-sealing of homes and the finishing of basements— which often includes enclosing mechanical equipment in some sort of closet—interior combustion air gets choked off, and naturally drafting appliances get starved of air.
The above list is not a comprehensive discussion of all the code requirements for water heaters. But it does cover some of the most common mistakes— all of which are easily avoided if you know what to look for.
EDITOR’S NOTE: One of our readers who lives in a region with regular seismic activity reminded us that strapping or other bracing is required for buildings that fit into one of the Seismic Design Categories specified in the IRC. If you live or work in one of these regions, chances are that your local codes have more specific details about requirements and best practices regarding water-heater bracing, so please check with your local building department.
More about water heaters
The Water-Heater Payoff – An expensive water heater may be efficient, but will it save enough energy to justify the purchase price?
Tankless Water Heaters – Tankless heaters don’t take up much room, and they don’t waste energy on hot water you’re not using.
Heat-Pump Water Heaters – Higher efficiencies than electric-resistance heaters will save money, but upfront costs are higher.
Drawings: Kate Francis
From Fine Homebuilding #288
Please contact Texas Valor Inspection Services to schedule a professional inspection for your home or business: 833-898-2567 or email larry@texavalor.com
How to Establish Your Business in a New Home

When you run a business from home, it’s easy to let your personal and work lives spill into each other. While some entrepreneurs have no problem juggling the two simultaneously, most people prefer some degree of separation between their business and home life. Establishing a dedicated workspace at home is a great way to accomplish this.
But what if you don’t have room for an office? Buying a new home could be your solution! Here are some workspace options to consider as well as some tips to help establish your business in a new home.
House-Hunting Considerations
If moving makes sense for your family, consider shopping around for a new house and buying a property with a little more space. All you need for a home-based office is an extra bedroom. If, on the other hand, you’re looking for a workshop where you can build products or a studio where you can perform in-house services for your clients—like hairdressing or massage therapy—you may need a property with a standalone structure or a garage. A workspace with a separate entrance will help your clients feel more comfortable about visiting your home-based business.
Take some time to consider your business needs and make a list of home features that will accommodate your workflow. Keep in mind that you may have to tour several properties before you find the perfect solution. Just be sure to leave your dog at home while you’re viewing properties so you can avoid run-ins with other pets or people with allergies!
Additionally, make sure you get a home inspection from a professional company, like Texas Valor Inspection Services, before committing to a purchase. An inspection report will help you budget for repairs and negotiate a better sale price on your home.
Coronavirus precautions are another thing to keep in mind when house-hunting right now. According to Redfin, many buyers are opting for virtual tours and 3D walkthroughs over traditional viewings in order to limit contact with strangers. Talk to your real estate agent about your preferred methods for viewing homes during this uncertain time.
Navigating Financial Hurdles
There’s no doubt that buying a new home is a major expense, even if you’re able to use the sale proceeds from your current home to fund the purchase. Buying a home comes with several unexpected costs, including closing fees and prepaid property taxes, that you may have to pay out of pocket. Look for ways to minimize these expenses. For example, getting a home inspection can help you lower your property tax assessment!
If you still need to recoup some of those home buying expenses to get your business going again, take advantage of the various small business funding solutions that are available to you. For instance, ZenBusiness suggests applying for government funding programs like traditional SBA loans and the Main Stress Business Lending Program. Besides these government resources, you can also take advantage of grants and other forms of financial assistance set up by private companies during COVID-19.
Making it Yours
After purchasing a moving into your new home, consider buying a few pieces of furniture and decor to optimize your workspace for productivity and comfort. One of the major advantages of owning your own workspace is the ability to set it up exactly how you want! As tempting as it may be to focus all of your attention on office decorations, try to prioritize comfort over style.
Invest in high-quality furniture, consider ergonomics, pay attention to lighting, and manage clutter through organizational systems and cord-management solutions. Finally, make sure your home workspace is equipped with a reliable internet connection and a separate phone line so you can conduct your business operations without frustrating disruptions.
Running a business from home gives you so much freedom and control over your life, but it isn’t always easy. Space concerns can necessitate a move into a bigger home, and with this move comes several logistical and financial considerations. Plan your move carefully to ensure your new space will accommodate your professional and personal life equally!
Written & contributed by Lisa Walker https://www.neighborhoodsprout.org/
Please contact Texas Valor Inspection Services to schedule a professional inspection for your home or business: 833-898-2567 or email larry@texavalor.com
Toilet Tank Repair Month... Yeah It's A Real Thing!

There really is a month dedicated to absolutely everything! October is National Toilet Tank Repair Month, the perfect time to better understand the effect a faulty toilet can have on your wallet, not to mention the environment. Knowing these startling facts will have you scheduling your toilet maintenance ASAP:
A leaking toilet wastes about 200 gallons of water a day—that’s 78,000 gallons per year!
Toilet flushing accounts for about 38 percent of household water use.
Even a small leak can quadruple the amount of water wasted each day.
An older toilet may use between three and seven gallons of water per flush.
How to Troubleshoot Your Toilet
Want to know if your toilet is performing as it should? Look for these key problems:
An especially noisy toilet, especially during refilling. This could mean the fill valve is not shutting off when it should.
A loose lever. A loose lever may be minor, but it could affect how well your toilet functions, especially if it sticks in a downward position.
A faulty flapper inside the tank. An old flapper can make your toilet prone to leaks.
A fill valve that won’t shut off. If your toilet is constantly running, a broken fill valve is a likely culprit.
When in doubt, opt for a replacement. New toilets come in all shapes and sizes and range from under $100 to $5,000+. There’s a model for every budget, and even the most inexpensive options are considered high-efficiency, using just over one gallon of water per flush.
Please contact Texas Valor Inspection Services to schedule a professional inspection for your home or business: 833-898-2567 or email larry@texavalor.com
Home Inspectors Offer Top House Tips for Resale

Water causes 99 percent of problems for homes
Home inspectors play an important role in the home buying process, their reports noting repairs that need to be made or issues that need to be worked out in the contract before a sale goes through.
Since they’ve seen homes in a variety of conditions, inspectors also have good advice for homeowners on how to keep their properties in good shape to ensure the sale goes smoothly. Tim Buell, president of the American Society of Home Inspectors, and local home inspectors offer their top tips.
Keep it dry
Water causes 99 percent of problems for homes, Buell says. “Make sure your house is water tight,” he says.
That means making sure gutters and downspouts are free of debris and working properly, ensuring the roof is properly sealed, caulking around doors and windows and making sure the landscape is sloped away from the house. If you have a sump pump, make sure it’s working properly.
Tom D’Agostino, an ASHI certified inspector with Ronkonkoma-based Long Island Home Inspection Associates, says homeowners should have their gutters cleaned professionally, not just in the fall when they collect leaves, but also in the spring and summer when tree pollen builds up.
“I go on a roof to inspect shingles and flashing and I see gutters are neglected,” D’Agostino says.
Check regularly under kitchen and bathroom sinks for leaks and have a plumber address any right away, D’Agostino says. Homeowners should also make sure that any exposed electrical wiring is covered and that junction boxes are properly covered with a watertight seal.
Get regular service
Boilers should be inspected, cleaned and serviced by a heating contractor, D’Agostino says. Fired systems should be serviced on an annual basis while a natural gas system should be serviced every two to three years under a service contract.
“Make sure there’s a ticket on the boiler that shows it’s been serviced,” D’Agostino says.
Homeowners with cesspools should keep track of when they are due for service and keep any related paperwork so they can keep track and so that a potential buyer is aware of the system’s service history.
Keep it clean
D’Agostino advises homeowners to not neglect bathroom showers and wall tiles.
“Grout when you need it grouted and caulk when you need to caulk,” D’Agostino says.
Keep bathrooms mold free by cleaning regularly.
Cleaning outside is also important. Homeowners with vinyl siding should look into power washing, D’Agostino says.
Buell recommends preparing driveways and walkways for winter with concrete sealers, such as V-Seal. Homes near saltwater — common on Long Island — can look into covering paint with a product that keeps it from fading, such as Rhino Shield.
It’s also a good idea to have smoke and carbon monoxide detectors on every level of a home and make sure they’re in good working order with fresh batteries, D’Agostino says.
Get it pre-inspected before listing
Hank Jaworowski of Smithtown-based Precision Home Inspection of America says the best way to avoid issues from coming up when someone is interested in buying your house is to get a pre-listing inspection.
“A lot of people don’t do that because they don’t want to spend the money,” Jaworowski says. “In my opinion, it’s a wise thing to do. The big-ticket items are normally what derails a deal. It’s usually the roof, mechanical systems or electrical system.”
If there are any issues, the owner should either fix them or disclose upfront that there are problems and note that they were taken into consideration when pricing the house.
“A house will just sell that much quicker” with a pre-inspection, Jaworowski says.
Source: American Society of Home Inspectors (ASHI); written by Lisa Chamoff; originally published in NewsDay.
Please contact Texas Valor Inspection Services to schedule a professional inspection for your home or business: 833-898-2567 or email larry@texavalor.com
5 Home Maintenance Tips For The Fall

You may be able to shave up to 30 percent off your energy bill this fall by conducting appropriate preparation measures on your home. For example, stripping and caulking the home to prevent drafts could be a major money saver.
The following five tips show how to clean and update your home to get it cold-weather-ready:
Check the roof. Sun exposure can cause warping, fading, chipping, and other deformities to roofs and siding materials. Inspect the roof for cracks or other damages, and repair any issues before winter.
Sweep the chimney. If there is a blockage, or if residue is built up, the risk of fire and other safety issues increases. Homeowners will want to make sure the chimney is clean and in tip-top shape for winter use.
Clean the gutters. Check gutters for leaves or other debris that may be blocking water flow. Be sure to clear them out so water can properly drain. Gutters are essential in preventing water damage and other costly repairs.
Check weather stripping and caulking. This is essential to keep windows and doors sealed. Windows and doors may become slightly detached from their frames during colder months, so it’s important to make sure they are properly attached at the beginning of the season.
Check out floors. With all the heat and moisture of the summer months, floors may be showing some signs of wear and tear. Scratched, dull, or damaged floors should be professionally scuff-sanded and recoated.
Source: American Society of Home Inspectors (ASHI)
Please contact Texas Valor Inspection Services to schedule a professional inspection for your home or business: 833-898-2567 or email larry@texavalor.com
Texas Valor Joins Certified Commercial Property Inspectors Association

Texas Valor Inspection Services has added commercial Property Condition Assessments (PCAs) to their offerings. PCAs are due diligence inspections associated with commercial real estate. Results of the PCA are documented in a Property Condition Report which is sent to the inspecting party.

Commercial property and building inspections are important for clients seeking to know the material condition real estate they may be purchasing, leasing, financing or maintaining. Texas Valor follows industry accepted guidelines of ASTM E2018-15 and the CCPIA SOP, the only recognized standards of major lenders.
As trained professional members of the CCPIA, we comply with the International Standards of Practice for Inspecting Commercial Properties (ComSOP) – the industry-accepted commercial inspection guidelines, and a proven process and system. As a baseline, the assessment includes the following services:
1) Walk-through survey. This is the portion of the service where the inspector conducts a thorough on-site visual examination of the property’s physical condition. The assessment is focused on the building’s critical systems and components, including the following:
· heating and ventilation systems;
· cooling system;
· plumbing system;
· mechanical and electrical systems;
· roof surface, drainage, and penetrations;
· exterior elements and fixtures;
· general topography of the building site;
· parking areas and sidewalks (to check for barriers to accessibility);
· wood decks and balconies;
· basement, foundation, and crawlspace;
· doors, windows, and interior;
· life safety components;
· kitchen area, including storage; and
· other site-specific areas of concern.
Depending on the scope of the project, the commercial inspector may use a team of specialty consultants who provide expertise in relevant areas during the walk-through survey.
2) Document procurement and review. For this portion of the service, the commercial inspector requests and reviews documents and records about the property. Some relevant documents may include lease agreements, Certificates of Occupancy, repair invoices, and maintenance records. The commercial inspector will also interview person(s) with the most knowledge about the condition of the building. Many potential deficiencies can be identified about a building this way, as well as in reviewing its history.
3) Inspection report. The final product of a commercial property inspection is the written report. It will contain concise details from the walk-through survey, documents procured, the results of interviews conducted, and any other third-party reports ordered as part of the commercial property inspection.
The inspection report will basically include a detailed summary of the inspector’s findings. This will provide the client with an inventory of the building’s major systems and components, and an evaluation of their functional and physical condition. These findings will highlight the property’s strengths and potential deficiencies, along with deferred maintenance issues. The inspection report can be used to understand and address the issues that will impact the building from a physical standpoint and financial perspective, as well as the health and safety of the building’s occupants.
Schedule a Commercial Property Inspection
Every inspection and subsequent report will be different based on the type of property and its use, the Scope of Work for the inspection, and even the inspector, so previous inspection reports should not be relied upon as an accurate record of its current condition. Contact me to discuss the specific needs for the project.
How Much Does A Home Inspection Cost And What Does It Typically Entail?

When a house is sold, offers received from buyers will almost always contain a contingency of an option period. The option period allows a buyer to schedule any inspections they want done to make sure the home doesn’t have any issues that are typically unnoticeable during showings such as electrical issues, termites, plumbing issues, foundation problems, roof problems, mold, etc. Inspections are almost always done at the buyer’s expense.
Because inspections cost the buyers money, buyers usually wait until they have the home under contract to have them performed. To compensate a seller for taking their home off the market temporarily for the option period an option fee is paid to the seller by the buyer.
The option period allows the buyer to negotiate repairs or renegotiate the purchase price based on any issues their inspections may have found with the seller. If an agreement cannot be reached, the buyer has the option to terminate the contract and receive all of their earnest money back.
The professional home inspection is the most standard inspection performed and will often be the springboard to deciding whether or not to pursue additional inspections based on the home inspector’s feedback and report.
A professional property inspection is an impartial third-party visual evaluation of the physical structure, foundation, electrical, plumbing, heating, air-conditioning, roof, built-in appliances, interior, and exterior walls, doors, and windows.
Upon completion, you will receive a State of Texas mandated formal report detailing the material conditions of each element inspected at the time of inspection.
Typically, a Certified and TREC Licensed Professional Home Inspector will recommend further inspections for any item they see may have a potential issue such as electrical, roofing, or foundation.
The average cost of a home inspection in Texas is about $350-$600 and varies based on the size of the home and may include the inspection of outbuildings, pools, spas, and outdoor kitchens.
5 Most Common Items That Fail An Inspection For A VA Mortgage

The VA appraisal is an assessment of the property’s value and condition by an independent VA appraiser. VA appraisals are required for every VA purchase loan. But don’t mistake the appraisal for a home inspection, which provides a more in-depth review of the home's physical condition. A home inspection is typically conducted once you are under contract and in your option period and can often expose issues that may delay a sale and or disqualify a home during a VA appraisal.
Heat
Heat is an important element of these inspections. There must be an acceptable and efficient source of heat for the home. This means the heat must provide comfortable and appropriate living conditions. If the only source of heat in the house is a wood-burning stove, it must be complemented with an alternative system that can maintain a minimum of 50-degree temperatures in the plumbing areas of the house.
Windows
The VA loan appraisers will also be very strict about broken windows. All broken windows must be properly repaired before the final report issued and/or the home is approved. This is because broken windows not only affect the heating bill, but they invite burglaries and present a negative image of the house to the neighborhood. The VA feels that buyers should be able to have a sense of pride about their recent purchase.
Electricity
Electricity is another element to be taken seriously by VA lenders and home-buyers. All homes must provide acceptable electricity for lighting and must have the proper equipment for doing so.
Roof Leaks
VA home loan inspectors will also check carefully for any holes in the roof that could lead to leaks and other defects that can severely damage and reduce the quality of a home. It is important to properly patch up any holes in the roof if you want to pass the VA loan inspection.
Termite Inspection
Loan underwriters will also require a termite clearance. Termites can eliminate your home’s candidacy in the VA loan program. The seller of the home must provide section one termite clearance and, in many cases, section two as well. As a seller, it might be a contingency of the contract to go the extra mile by making the required guidelines and repairs set about in section two of the termite report.
Any violations of these guidelines can result in the disapproval of the home’s acceptance in the VA home loan program as well as a full refund of the buyer’s deposit in the event that a defect is found after an inspection.
What to do if the report requires repairs:
The seller is responsible for all costs and liabilities of completing the required repairs as reported on the VA home loan inspection.
If the seller does not make the required repairs, the buyer may cancel the contract.
Going crazy during the lock-down and looking for a fun and educational family project? Plant a Victory Garden!

Stuck at home with the kids and going crazy sitting and waiting for the COVID-19 lockdown to pass? Angry that you can’t get the food items you are accustomed to from H-E-B? Worried that it feels like you are not controlling anything happening lately? Take local control with a Victory Garden!
Victory gardens, also called war gardens or food gardens for defense, were vegetable, fruit, and herb gardens planted at private residences and public parks in the United States, United Kingdom, Canada, Australia and Germany during World War I and World War II. In the war time governments encouraged people to plant victory gardens not only to supplement their rations but also to boost morale.
Planting a Victory Garden engages the whole family in an activity that
1. Is outdoors (Yay!)
2 Is educational (Yes this counts as homeschool activity if you log it)
3. Is fun
4. Is inexpensive
5. Gives you and your family control over a real local food supply
But wait, you say, I don’t know how to plant a garden!
Not to worry, I got you on this! Follow my guide below to make an EZ Victory Garden today. In this example I used a 6’ x 2’ x 2’ galvanized steel trough from Tractor Supply. You can scale it down by a third by using the 4’ x 2’ x 2’ steel trough if you like, just cut all the inventory by roughly a 1/3.
Project time
4 hours including shopping time
Project Inventory
From Tractor Supply
1 - 6’ x 2’ x 2’ galvanized steel trough $180
(Alternatively, the 4’ x 2’ x 2’ trough is currently on sale for $95)
1 – Bag Easy Straw Mulch $15
(Optional)
From Home Depot
8 – 50 qt Magic-Gro potting soil $115
(Less expensive options available)
1 – Roll Weedblock Film $13
1 – Miracle-Gro Garden Feeder $12
(Optional)
Fruits & Veggies – Customize as you like here. We opted mostly for plants. The only seedlings we planted were lettuce and cabbage.
2 - Griller Zucchini 5” $8.76
1 – Big Bertha Bell Pepper 4.5” $3.40
2 – Strawberry 4.5” $7.56
1 – Cantaloupe 5” $4.38
2 – Tomato 4” $8.76
1 – Red Bell Pepper 4” $8.75
2 – Cucumber 4.5” $7.56
1 – Packet Cabbage Seeds $1.59
1 – Packet Lettuce Seeds $1.69
How to do it
1. Select an area of your yard that gets a lot of direct sunlight.
2. Place the trough in the desired location and cut in around the base with a spade, outlining the container.
3. Move the trough and dig out the lawn to create a pad, leveling the planter.

4. Drill holes in the bottom of the trough to allow for drainage.

5. Cut the Weedblock Film to the dimensions of your trough 6’ x 2’ in our instance.

6. Place the trough on the prepared pad and put the Weedblock Film in the bottom.

7. Fill with potting soil, taking time to spread evenly as you go

8. Plan out your garden layout on paper or by setting plants on the planter.
9. Plant your garden according to your plan. Ensure you left enough room between the plants!

10. Water the plants (We used Miracle-Gro plant food in our water).

11. Once the soil settles a bit, you can top it with the hay mulch which will ass additional nutrients and help keep the moisture in the soil.
12. Watch it grow!
Educational topics I discussed with my son.
1. The history of Victory Gardens.
2. How to calculate volume using 3 dimensions and square footage using 2 dimensions (I explained the concepts of square feet and cubic feet using dimensions, then I had my son calculate the approximate volume and square footage of the planter).
3. Soil science and crop rotation on large farms (This was a general discussion at a 4th grade level with some history of why we do it and what can happen if it is not managed properly).
Enjoy!
Larry Allhands
Why You Really Need a Home Inspection

Buying a house is probably the single largest investment you’ll ever make – learn how getting a home inspection can help you get the most value for your home.
Buying a house is probably the single largest investment you’ll ever make, and you want to ensure you get the best value for your hard-earned dollar. That’s why more and more home buyers today are turning to professional Home Inspection experts. A professional Home Inspector takes a close look beneath a house’s surface and then prepares a detailed written report for the prospective buyer on such things as the condition of the foundation, electrical service, roof, insulation, and other critical structural factors. Your realtor can help you connect with an experienced trusted Home Inspection service in your community. Although costs will vary, you can probably expect to spend three to four hundred dollars for an inspection of a single-family home.

And who pays for it? Well, since the benefit is almost entirely that of the home buyer, it’s usually the buyer who pays the cost of the home inspection …particularly in a “hot” real estate market, where the home sellers have more leverage. All things considered, it’s a small price to pay for the peace of mind it provides, and the negotiating power it can give you — especially if it indicates that there are major repairs required, but you decide to make an offer anyway. Even though it is usually the home buyer paying for the inspection, some sellers will opt to certify their home as “Move In Ready” by having an inspection done up front. Read more about this type of certification inspection here.
When it comes to making your offer to purchase, your realtor can provide you with good advice on how to allow for a home inspection as a part of this process. Subject to the homeowner’s permission, you can commission a Home Inspection before or even after submitting your offer to purchase. This is done by having your realtor prepare a conditional offer that’s contingent on a Home Inspection report that’s acceptable to you. This approach gives you some distinct advantages: if the conditional offer is accepted, the property is temporarily held against other offers, yet you still have a legal escape route if the report turns up some major negative surprises, such as a bad roof or a crumbling foundation. On the other hand, if the conditional offer isn’t accepted, then the need to pay for a home inspection may never arise. Your realtor can counsel you on the best approach to suit your market and your individual situation.
Home Built In The 1960’s-1980’s? Check To See If It Has This Electrical Panel: FIRE HAZARD!

One of the most popular brands of electric panels from the 1960's through the 1980's was the Federal Pacific Stab-Lok circuit breaker box. Millions were installed all across the country in homes and apartments, condos, and commercial real estate. Experts have questioned them as posing a real potential fire hazard. Federal Pacific (FPE)/STAB-LOK electrical panels are panels that have been the subject of UL (Underwriters Laboratories) and consumer concerns related to inadequate safety protection. Consistent evidence has been presented that FPE/STAB-LOK breakers have a tendency to become loose and experience failure of unit circuit protection. The breakers often do not trip in the event of an emergency leaving the circuit unprotected - this is a SIGNIFICANT FIRE HAZARD. In addition, Follow this link for further information about these panels and the dangers they pose:

How to identify FPE breakers
The breaker box door usually says “Federal Pacific Electric” or “FPE.”
A website called InspectAPedia supplies photos and further steps for identifying FPE Stab-Lok panels and breakers. Still unsure?
Ask an electrician to remove individual breakers from the panel — you could be electrocuted if you do it yourself — and look for the E-shaped and F-shaped openings that are unique to Stab-Lok breakers.
How to identify successor Stab-Lok breakers made under other brand names
Again, most — but not all — will have the word “Stab-Lok” in the center or on the side of the breaker panel.
You can also feel free to email me pictures of your electrical panel and I would be glad to tell you if I believe it is an FPE/Stab-Lok panel for free. info@texasvalor.com
The 10 Most Common Defects Found in Home Inspections - And the Average Cost to Fix Them!
The process of buying a new home can be both exciting and nerve-wracking. While the initial stages of browsing through real estate listings, touring homes, and dreaming about your future can be fun, you’ll also want to make sure that you’re investing in a worthy piece of property. Especially considering that this will likely be the largest single investment you will make in your life. To ensure you aren’t buying into a ‘money pit’ of problems, it’s essential to have a thorough home inspection performed as a part of the home buying process.
To highlight this point, home inspections nation-wide have been uncovering much-needed property repairs. More than 1 million repairs needed more than $11,000 in costs, according to a February review of 50,000 home inspection reports by Repair Pricer, a home repair estimating resource.
Nearly 55 percent of homes analyzed across the country had doors that needed adjusting, which could be an indicator of foundation issues, the report showed. 54 percent of the homes lacked exterior caulking and sealant, which could leave the home susceptible to extensive water damage and higher energy bills. Furthermore, about 48 percent of homes lacked GFCI protection—this could pose a dangerous electrocution risk to homeowners around water-prone areas like the kitchen or bathroom.
“Homebuyers and real estate professionals across the country should leverage these insights to better position themselves in the stressful negotiation process,” says Christian Adams, CEO of Repair Pricer. “In places like Texas, for example, buyers may only be given three to five days to complete the inspection period, meaning they may only have 24 hours or less to make a decision. During this period, having clarity and insight into the cost of repairs listed in a home inspection report is critical to avoid leaving money on the table.”
The most expensive home defects—uncovered in 9 to 20 percent of the homes studied—ranged in repair prices from slightly more than $1,000 to less than $10,000.
The following is a chart from Repair Pricer of the 10 most common home defects found in inspection reports:

When you consider that in Texas, a good home inspection conducted by a TREC licensed and certified Professional Real Estate Inspector will usually cost just 0.1 percent of the price of the home you are investing in, it makes sense to always have your property thoroughly inspected while in the option period to give you the peace of mind to make the buying decision and foresight needed for proper negotiation and safely closing of the deal.
Many low budget home inspection service companies use either TREC licensed Apprentice Inspectors or standard Real Estate Inspectors which have less stringent educational and experience requirements than the Professional Real Estate Inspector License. Texas Valor Inspection Services only uses TREC licensed Professional Real Estate Inspectors which are the highest qualified inspectors in the state.
Contact Us today to schedule your home inspection!
Home Inspector Requirements in Texas - What You Don't Know

Just as in any industry, home inspectors can and often do vary in skills, experience, and reliability. But what you may not know is how much the quality of home inspectors may vary from state to state.
Some states do not have any regulation of home inspectors at all, so anyone can just open a business and declare themselves a home inspector with no licensing requirements. This is the case in states like Utah, California, Colorado, Georgia, Idaho, Iowa, Kansas, etc.
Other states are lightly regulated and have very minimal licensing requirements such as Kentucky where they require you to submit an application, have a GED, pass the National Home Inspector’s exam and pass a background check.
Then there are states with highly regulated and stringent requirements for licensing like Texas. Home inspectors in the state of Texas are regulated by the Texas Real Estate Commission (TREC). They have some of the most thorough oversight and documentation in the country.
The requirements to be licensed as a professional home inspector in Texas are as follows
Citizen of the United States or lawfully admitted alien
18 years of age or older
Meet TREC’s qualifications for honesty, trustworthiness, and integrity\
330 classroom hours of qualifying real estate inspection courses as follows:
40 hours in foundations
38 hours in framing
34 hours in building enclosure
34 hours in roof systems
24 hours in plumbing systems
34 hours in electrical systems
34 hours in heating, ventilation, and air conditioning systems
14 hours in appliances
8 hours in Texas Standards of Practice
20 hours in Texas Standard Report Form/Report Writing
12 hours in Texas Legal/Ethics
8 hours in Standards of Practice Review
8 hours in Inspector Legal & Ethics
30 hours in any qualifying inspection subject
40 hours of field work AND 24 hours of approved experience coursework with a qualified instructor with at least five years of active experience as a Texas Professional Inspector.
Pass a Texas Department of Public Safety background check (With fingerprints)
Pass the Texas State Home Inspection exam
Pass the National Home Inspection exam
Provide proof of professional liability insurance
As a result of the TREC requirements and oversight, Texas has one of the most professional and competent cadres of home inspectors in the nation. To see what the requirements for home inspectors in your state, follow this link https://www.spectora.com/r/home-inspector-license-requirements-map/
For more information on home inspections in the greater Austin market, contact us at Texas Valor Inspection Services info@texasvalor.com or visit www.texasvalor.com
What is CSST?
CSST stands for Corrugated Stainless Steel Tubing. It appears to be a yellow flexible tube and can be found in some homes in the attic or as a feeder tube to gas appliances. CSST is a popular product in the greater Austin TX area, since many homes here have natural gas service. Although it is materially more expensive than traditional black iron pipe, CSST is quick to install and requires less cutting, fitting and labor time. This means that CSST is often cheaper and easier to install overall than black iron pipe, so many builders opt for it.
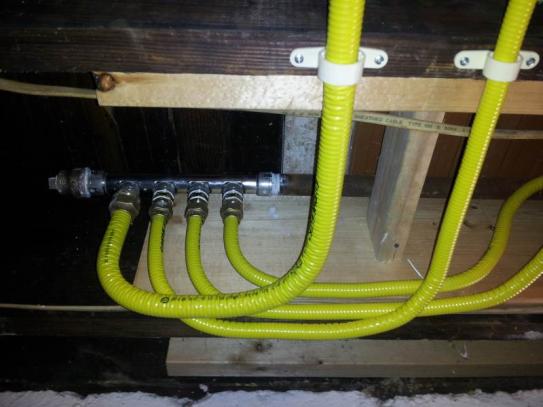
CSST does have very specific installation requirements. One such requirement is that the tubing itself must be bonded and grounded to the home electrical system. Failure to do so can cause pin holes to form if/when lightning strikes in the area, leaking natural gas into the home and ultimately fire, injury and loss of property or life. Essentially the CSST pinhole caused by a lightning strike on an ubbonded system can become a blowtorch in your home. CSST should not be confused with the other common flex tubes used to connect the natural gas pipe to an appliance. They are two different products.
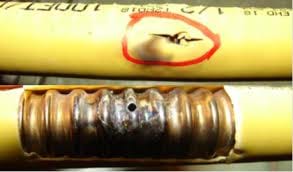
Unbonded CSST after lightning strike
CSST electrical bonding and grounding should be verified by a licensed electrician or plumber. A thorough inspection of CSST should include confirming the correct size and installation of the ground/bond wire.
How A Home Inspection Helped Me Lower My Property Tax Assessment
As my father used to say when I was growing up, a few things in this life are certain… among those are death and taxes. We, homeowners, are accustomed to seeing our assessed property values increase year after year, even when there are no improvements and even though our home suffers from the wear and tear associated with daily living.

Some of us simply resign to the valuation increases. Others file a protest online and, after being denied online, just accept the new assessment. What many do not know is that you can actually set a hearing to argue your case for lower values, and given the right data and preparation, you can actually win!
Such was the case for me this year. My home clocked a hefty 4% increase in assessed taxable value. I protected online, was promptly denied, and then scheduled a hearing. Fortunately, I had a home inspection performed by a third party the year before for my 1 year home builder warranty, so I brought it along with some comps I thought would help.
I made the argument that my home not only did not increase in value, but that it want down 0.8% or stayed the same. To my surprise, they immediately shot down my comps, comparing them to their own, which were admittedly more accurate. But when I broke out the home inspection, they took note of all of the professionally documented “defects” in my home. Using this, they were persuaded that my home had not increased as much as they initially assessed and I was able to lock in a 1.7% increase in assessed value - and that was on a new construction home. All homes have defects, and these defects can be properly documented in a report by a skilled professional home inspector.
If you would like to schedule an appointment for a home inspection, you can follow this link to our online scheduler https://www.texasvalor.com/schedule-an-inspection or feel free to call us at (512) 630-0611.

The ultimate real estate agent home inspection checklist

Download a pdf copy of this list to print or share with your client by clicking here
FIVE STEPS TO HELP BEST PREPARE YOUR SELLERS FOR THEIR HOME INSPECTION
As many of you prepare for the busy selling season, don’t forget to properly prepare yourself and your clients for home inspections, one of the most critical stages of a real estate transaction.
By properly preparing for an inspection, your sellers can avoid problems that could get in the way of a clean inspection report and complicate a sale.
That’s why we put together this home inspection checklist to help you go into the buying season ready to minimize snags for yourself and your clients.
SHORE UP MINOR WEAR AND TEAR
Routine maintenance is an easy way for homeowners to keep up with minor problems before they escalate. Not all homeowners do this, of course, and even if they do it’s good to double-check some common problem areas prior to inspection.
Outside the home, repair damaged masonry on steps and walkways, and seal cracks in the driveway. Not only will the home look better, but future issues will be prevented. Re-caulk around exterior doors and windows, check flashing and replace any missing or damaged shingles. Replace cracked or broken window glass and loosen any windows painted shut.
Have the fireplace and chimney cleaned and checked by a professional. If home inspectors can’t see into the chimney because of buildup, they won’t be able to inspect it and may need to return after it has been cleaned.
Inside, relatively minor fixes can improve home inspection results. Check for leaky faucets and fixtures, and repair grout around tubs and sinks. An electrician should inspect receptacles and switches and make any needed replacements or repairs.
SERVICE LARGE APPLIANCES
Homeowners should arrange service appointments for their furnace and central air conditioning so that any issues can be addressed before the home inspection.
If the home has battery-operated smoke and carbon monoxide detectors, put in fresh batteries and install additional units if any are missing. Wired units should be tested to ensure they’re functioning.
VERIFY THE COMPLETENESS AND ACCURACY OF THE HOME DISCLOSURE
A seller disclosure form is basically a list of everything the seller knows about the condition of his or her property. This allows potential buyers to understand exactly what they are getting. All physical defects and issues affecting a property's value should be disclosed on the form. The more accurate and transparent you can be on this, the less chance there will be any unexpected discoveries that may hang a deal up.
PULL A CLUE REPORT FOR THE HOME
Sellers can also provide something called a CLUE (Comprehensive Loss Underwriting Exchange) Report —which is a 7-year claims information report from the national underwriter’s database on the property. this can be obtained from the homeowner’s insurance agent and will reveal any claims on issues such as flooding, roof damage from hail, fires, or the lack thereof, etc. This is basically a Car-fax report for the home. Providing this to the buyers will add to the transparency of the transaction and ensure fewer late discovery hang-ups.
PREPARE FOR INSPECTION DAY
On the day of the home inspection, a few easy steps will make the process go as smoothly as possible.
First, allow sufficient time for the inspection. A professional home inspection will take an average of from two and a half to three hours, longer if the home is large. It’s best if the sellers aren’t there for the inspection, though the potential buyer will usually want to be there and should be if at all possible.
Be sure that inspectors have access to all areas of the home. Provide keys to any locked areas, and allow access to the attic, crawl space, garage and yard. Be sure they have access to components such as electrical panels, the main water shutoff and gas meter. Also, make sure they can easily access the water heater, furnace and central air conditioning unit.
Homeowners should make arrangements for pets to be out of the house or contained in a crate for their own safety and that of the home inspector. Dogs, in particular, can be disruptive, and some can become distressed by having an unfamiliar person in their “territory.”
It is always a good idea to store small valuables and medications out of sight and in a secure location for peace of mind. One option is for the homeowner to simply take these items with them when they leave for the duration of the inspection.
Taking these steps can go a long way to prevent or address problems that could negatively affect the inspection, make a potential buyer less confident about the home and lower your and your clients’ chances at a smooth transaction and a top-dollar sale.
An inspection-ready home presents itself best for evaluation and makes the entire process go more smoothly.
Making Your Real Estate Listings Come To Life With Drone Videography
The use of drones in real estate has opened up new ways to showcase a property. Reaching new heights, you can now highlight interesting views that buyers couldn't before see. Is the property close to recreational areas, attractions, school etc? What does the neighborhood look like? What is the lay of the land? Drone photos and videos are a perfect way to highlight this.
It's not just about flying. We edit your drone photos and videos to ensure they look their best. See our latest example below of 10 acres of land for sale in Burnet, TX.


Using drones to market a property have been shown to help agents to sell faster and gain more listings. Perhaps this is why high volume real estate agents use aerial photography 3.5 times more often.
According to NAR 85% of buyers and sellers prefer to work with an agent using video. 83% of home sellers prefer agents who use drones to market their property. Video creates an engaging experience. It trends better on social media and garners more clicks on google.
We utilize video to tell story about a property. The story that will make it come to life on your MLS listings! Contact Texas Valor Today to talk about your drone projects!
Water Heater Backdrafting
Backdrafting at a water heater is a common defect identified during home inspections, and it’s almost always a condition that the homeowner or occupant is not aware of. This happens when the exhaust gases from an atmospherically vented water heater spill out into the room, rather than safely leaving the house through the vent. Exhaust gases contain carbon monoxide and high levels of moisture, so this is always a condition that should be corrected.
An atmospherically vented water heater is a type with a draft hood, which relies on gravity to get the exhaust gases out of the home. Exhaust gas is hot and therefore lighter than the surrounding air, which is what allows it to rise up the vent and out of the house. These are very simple devices that require no electricity to operate, however, this isn’t a very reliable draft method. Today I’m going to share some clues that could indicate a problem with a water heater drafting properly.
Backdrafting exhaust gases can condense at the top of the water heater tank. Over time, this corrosive condensate will begin to corrode the top of the tank. A leaking shutoff valve can also cause corrosion at the top of the tank, but that type of corrosion is easily distinguishable back corrosion caused by backdrafting because the worst area will be located directly below a valve.

If you can see condensation at the top of a water heater tank, you’re basically watching the water heater backdraft. The photo below shows moisture, rust, and melted plastic at the top of the water heater.
The vent connector at a water heater needs to pitch upwards towards the vent, and should ideally not have any quick turns, especially right at the draft hood.
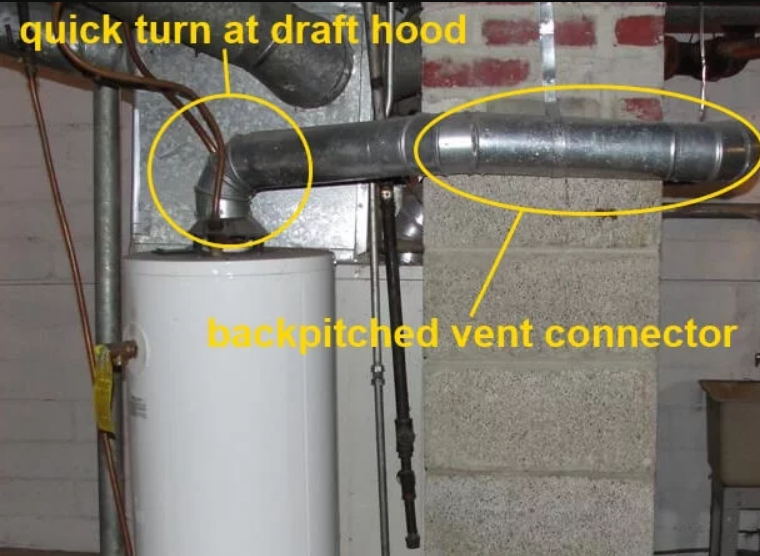
If you find these types of clues, there might be a problem with the water heater drafting properly.
I have several different tools that I can use to check for proper draft at a water heater if I’m feeling fancy, but there’s really no need. If I want visual evidence to put in an inspection report, I usually hold a mirror up the draft hood and take a picture of the mirror getting fogged up.
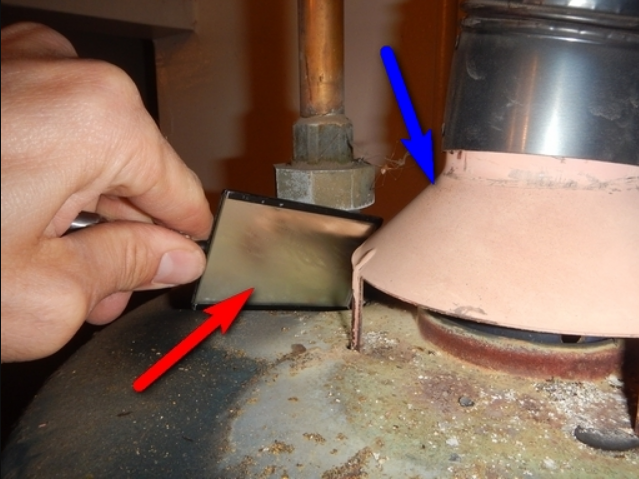
Any water heater backdraft condition should be evaluated and corrected by a qualified professional.
Top 4 issues found during home inspections
Buying a house is the biggest investment most people make during their lifetimes. Whether it’s a newly built home or a fixer-upper, having a certified home inspector evaluate its condition is highly recommended before committing to a purchase. Here are the top four common causes of defects inspectors regularly come across during home inspections.
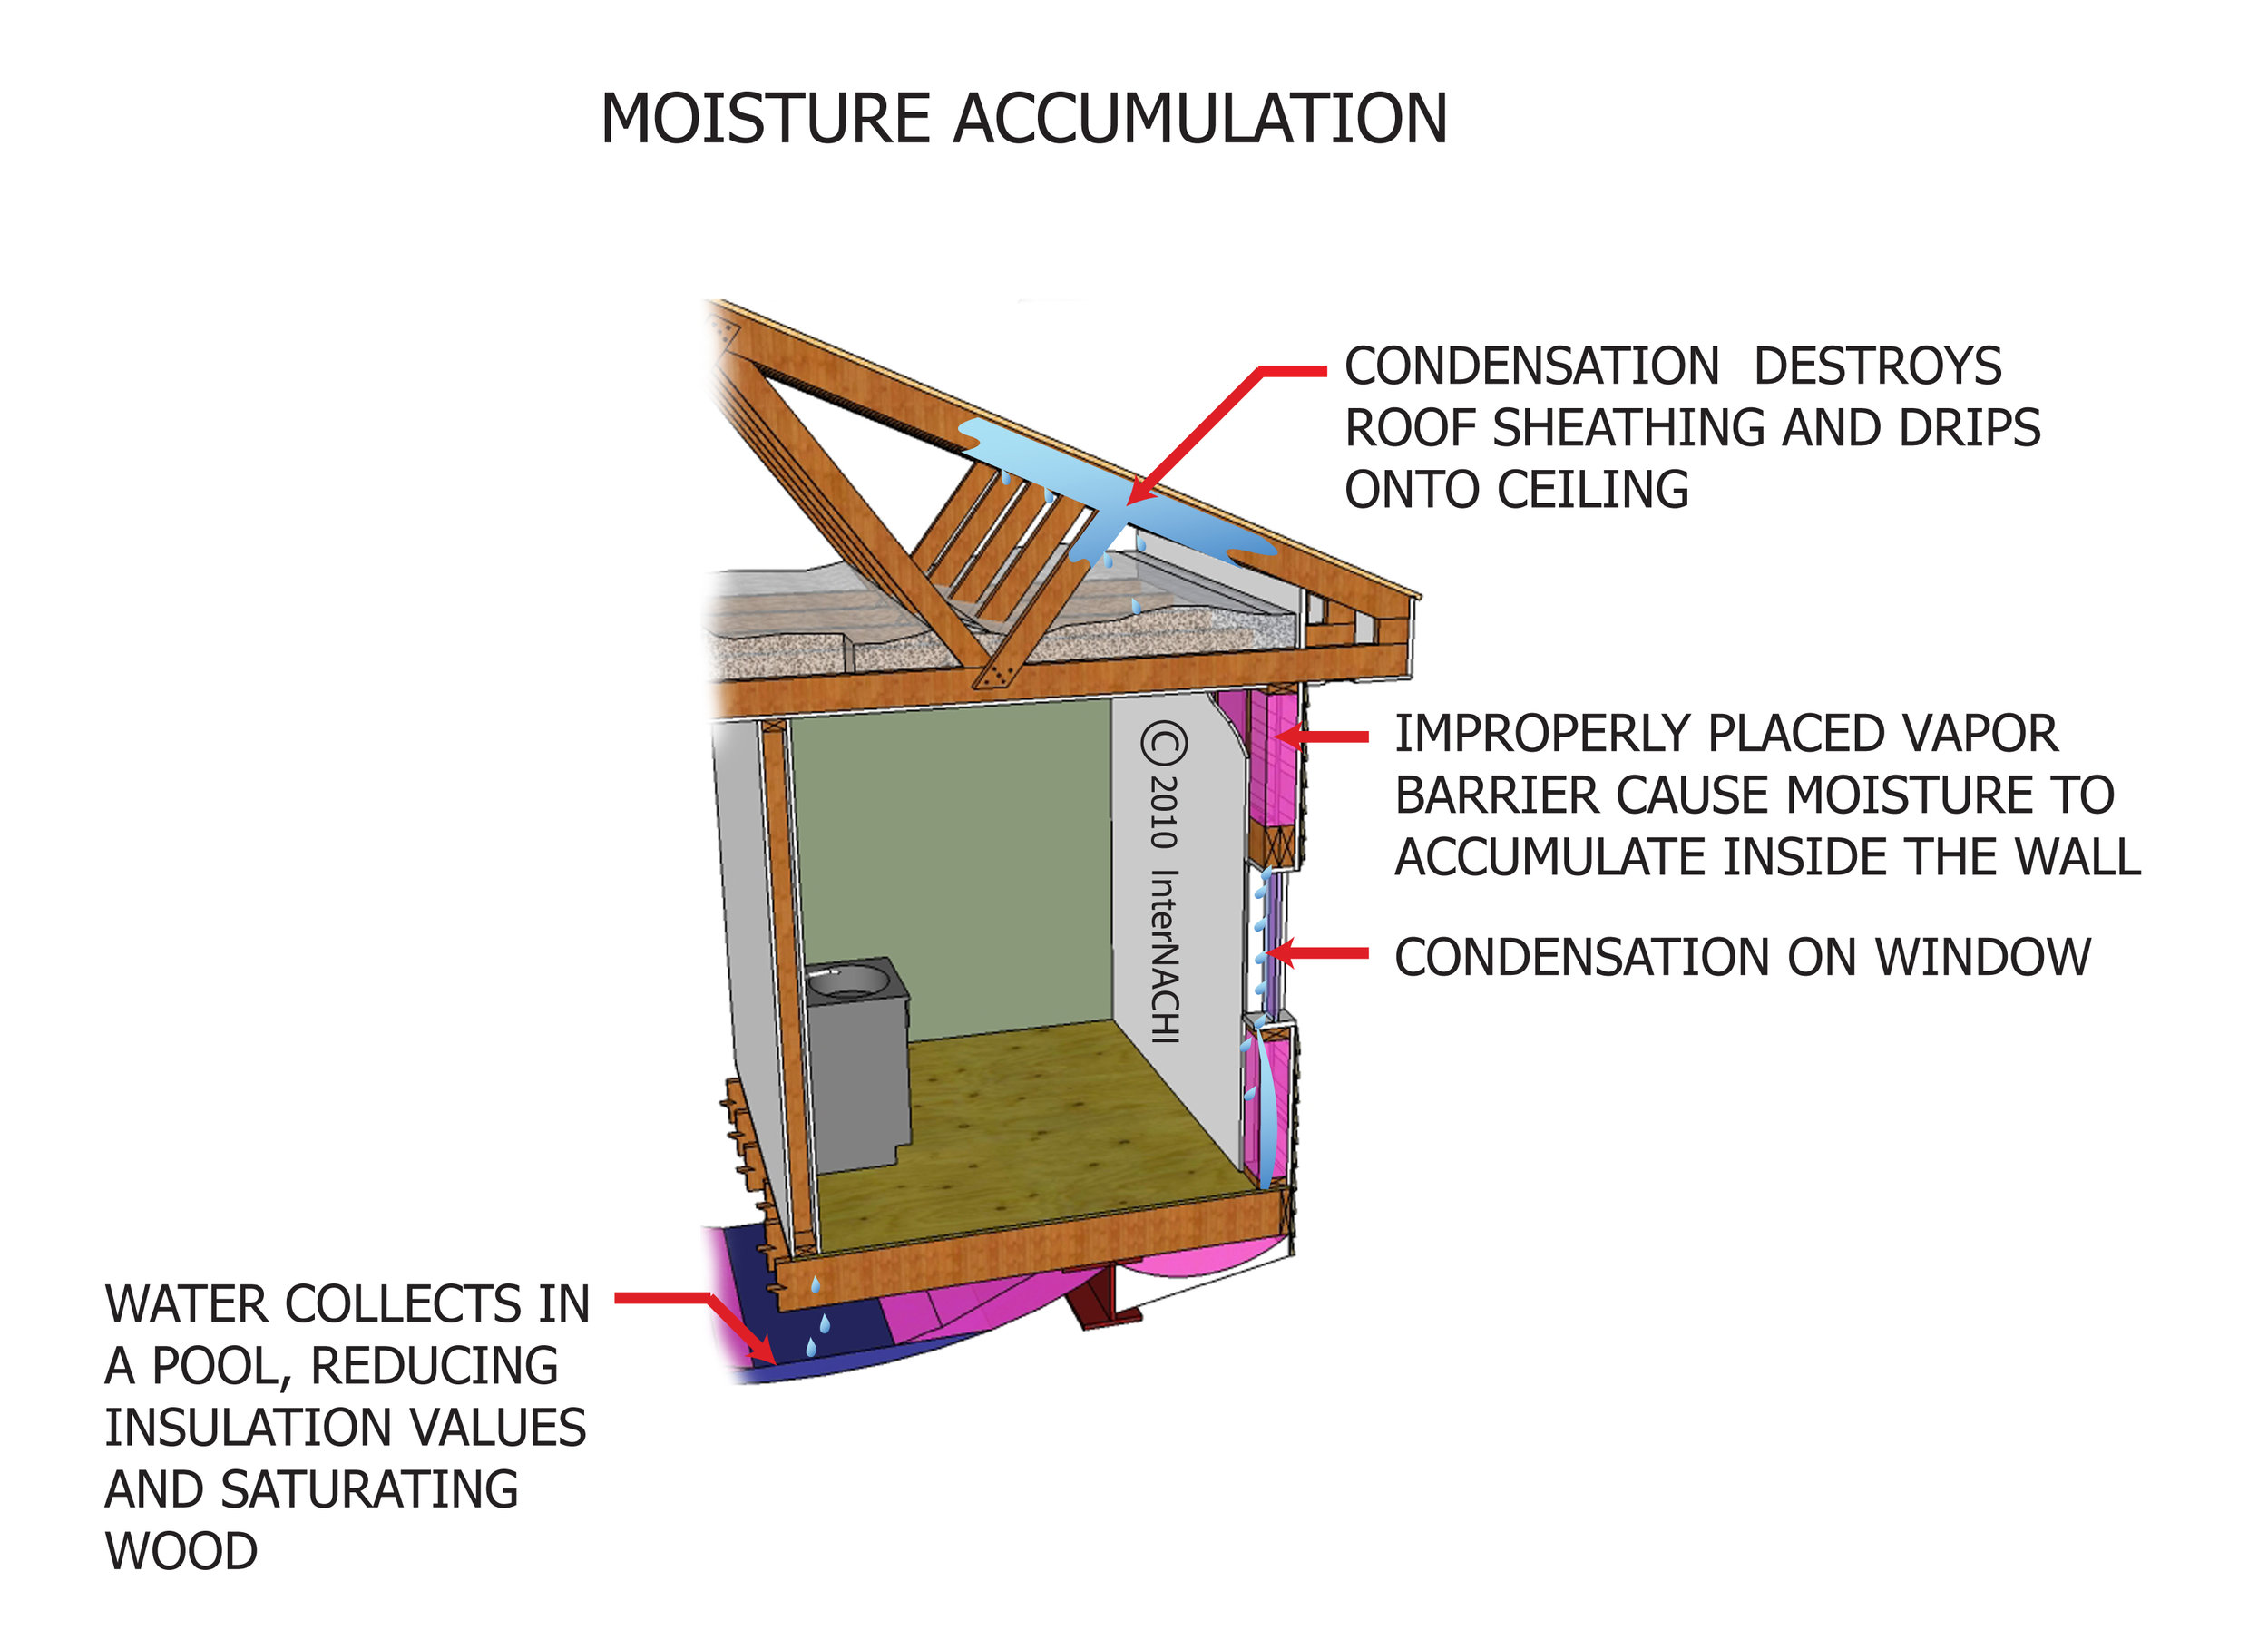
Water Damage
Moisture and drainage issues can lead to dry rot, foundation problems, structural damage and toxic mold in a home. Some common causes include:
Grading that slopes toward rather than away from the structure
Roof leaks from missing shingles, improperly installed flashing or failed sealant around penetrations
Leaks from connections to kitchen and bathroom fittings and fixtures
Tree roots invading and clogging lines, causing water to back up into the home through the drains
Gutters clogged with leaves or other debris that overflow and damage the stucco or siding

Faulty Wiring
Faulty electrical wiring is a common cause of house fires, especially in older homes. Home inspectors often find the following dangerous conditions:
Exposed wires or improperly spliced connections
Wrong size breakers in electrical panels that allow circuits to become overloaded
Overloaded circuits that cause wiring to heat and its insulation to melt away
Improperly wired receptacles where the black hot wire and neutral white wire are reversed, which can be a shock hazard
Mold
Surface mold in poorly ventilated bathrooms is common and usually not harmful. Black mold in basements or crawl spaces, however, is a serious problem. Here are some of the concerns associated with black mold:
Black mold can cause asthma and other serious health problems
Black mold can be expensive to remedy
Although it can be removed, ensuring it won’t return can be difficult
Black mold almost always indicates a serious underlying problem, such as cracks or leaks in the foundation

Water Heater Issues
Whether it’s heated by gas or electricity, water heaters are among the most neglected items in a home. Signs that a water heater needs replacing include the following:
Rust on the heater’s bottom surface and lower edge indicate the heater is on the brink of failing and replacement is overdue
A stuck or jammed TPR valve can cause the water temperature and pressure inside the tank to exceed safe levels, potentially causing serious personal injuries from scalding and property damage from an explosion
Blackened areas near a gas water heater’s burner usually result from improper combustion, which can be a sign of deadly carbon monoxide emissions
A water heater more than 10 years old is at risk of failing, and unless it’s situated in an area where flooding won’t cause serious damage, it should be replaced
The Role Of Expansion Tanks In Your Water Heating System
When a water heater is connected to a closed system, an expansion tank must be installed to prevent excessive pressure in the water. To help understand what this is all about, please read on.
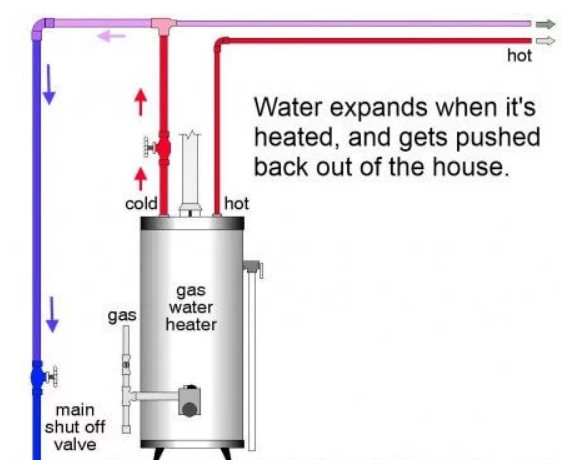
OPEN SYSTEMS
When a water heater fires up, the water in the tank expands. When this happens, where does the water go? Right back out the cold water inlet, all the way back to the water supply coming into the house. The municipal water supply for the house acts as a gigantic expansion tank… and nobody notices. This is illustrated in the diagram to the right.

CLOSED SYSTEMS
What happens when a one-way valve, or check valve, gets installed on the water supply piping for the house? The water has nowhere to go. As the water heater heats the water, it expands, which builds up pressure. When the pressure builds up enough, the temperature and pressure relief valve on the water heater simply does its job. It relieves the excess pressure by leaking a little bit of water.

This doesn’t happen every time that a pressure reducing valve or check valve is installed, but there may be other problems that show up in the house, such as the toilet fill valves randomly re-filling toilets, or faucets chronically dripping.
In Texas, it’s rare for a check valve to be installed on the water supply line for the house, but it’s fairly common to have a pressure regulator installed. The problem that these regulators can create is that they will act as a check valve; they’ll allow water into the home, but they won’t allow water back out. This creates what is called a ‘closed system’.

EXPANSION TANKS
When a closed system exists on the water distribution piping in a home, an expansion tank needs to be installed somewhere on the plumbing system. This is a fairly simple and straightforward fix; an expansion tank uses an air bladder which is compressible which gives the water somewhere to go when it expands, and the temperature and pressure relief valve on the water heater will stop causing problems.
REQUIRED OR JUST A GOOD IDEA?
As of 2018, the International Plumbing Code 607.3 requires an expansion control device whenever a check valve or pressure reducing valve is used in the water supply.
Where a storage water heater is supplied with cold water that passes through a check valve, pressure reducing valve or backflow preventer, a thermal expansion tank shall be connected to the water heater cold water supply pipe at a point that is downstream of all check valves, pressure reducing valves and backflow preventers. Thermal expansiontanks shall be sized in accordance with the tank manufacturer's instructions and shall be sized such that the pressurein the water distribution system shall not exceed that required by Section 604.8.
Texas Valor Blog:
Welcome to the Texas Valor Inspection Services Blog. Here you will find many tips, tricks, and relevant information on our services.